Prologue[]
The Prologue set you up for the further Missions by showing you the important locations around the map. It also introduces the People that will Guide you through the rest of the Story Mode.
Meet Windsor(26 XP)[]
To complete this mission, all you have to do is walk up to Windsors camp, and step into the marked area in front of the house.
One person doing this is enough, the rest should spread out and collect supplies.
Patrol the AO(52 XP)[]
This mission tasks you with visiting certain locations that will be important in the following missions. Communicate through the chat if you're going for a position and make sure all are covered. The locations are:
● Police Checkpoint (top left of the map, north of Radio Hill)
● Thalim (CentralNorth part of the map, you need to be near the middle of the town)
● Kurin (NorthEast part of the Map, formerly known as Graveyard Hill)
● RA Facility (East Part of the map)
● Balaad (The hill where you get dropped at the beginning)
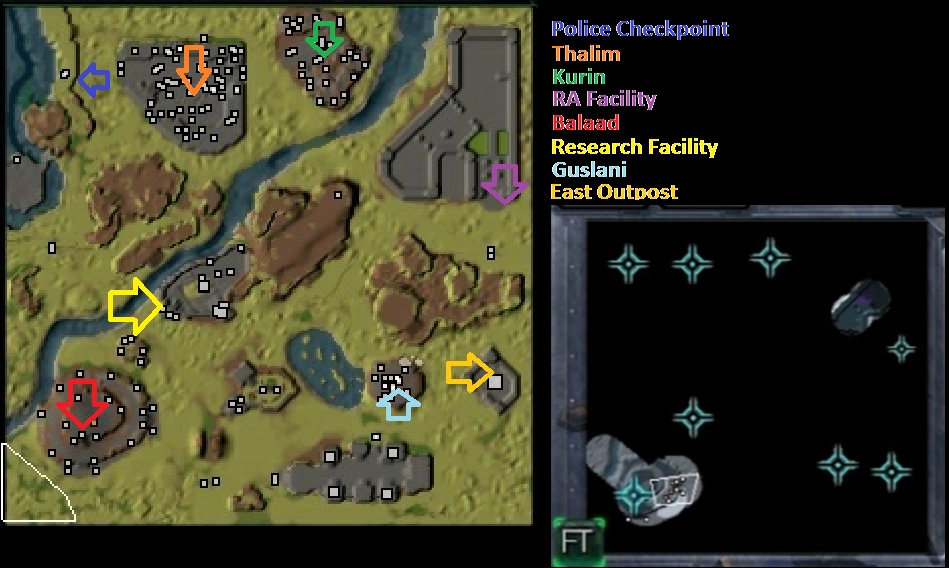
● Research Facility (CentralArea, former Farm)
● Guslani (SouthEast part of the Map)
● East Outpost (East of Guslani)
Restore the BMDD Network (61 XP for all 6)[]
You are tasked with repairing 7 randomly selected Radio Towers on the Map. To repair them it is required to stand in the marked area for a few seconds. While standing in it, you are unable to attack or use abilities, but you can leave at any time to attack and use abilities again.
Succeeding on this mission, by restoring all Towers, give you better T1 pings for future missions.
NOTE: After the Patrol AO Mission and Restore BMDD Network mission you get a randomly selected mission from the following missions:
● Place Sentry Guns
● Find and Escort the infected Civilians
Chance of: Sentry Guns (70 XP)[]
For this mission 7 Sentry Guns will be dropped at one of several random places of the map. The locations where the Sentry Guns must be placed are shown on the map. Because of the random location of the sentry drop, it is advisable to spread out after the Patrol Mission to be ready for the drop. Usually one person can do the 5 sentries at the top of the map (#1,2,3,4,6). Another person for the two in Guslani (#5,7) and another one for #8.
This mission can be stalled to revive dead players or farm exp. This is usually done by delaying #8 until 10 seconds before the timer runs out.
NOTE: You may notice some people, often Platoon Leaders, will kill themselves about 1 minute before the mission ends. You should not revive them until they ask you to. This is because the next mission last 3 minutes and after this there is a mini drop, and for the later to trigger at least 1 person has to be dead for 4 minutes. Note that other people can get a mini even if they died less than 4 minutes before the reinforcement as long as someone has been dead for 4 minutes.
Chance of: Rescue civilians (70 XP for all)[]
This mission consists of two parts.In the first part you must go to a town and stand it the marked area to trigger the second part.The second part requires you to get civilians from their homes, gather them and then escort them to Dr.Morrows lab.
Defend Balaad Bunkers (13xp per Bunker)[]
2 bunkers east (more important as this is generally where we camp) 2 bunkers south (slightly harder to defend) kiting important.The bottom left is especially vulnerable. 1 bunker must survive for mission to succeed, ideally at least the 2 east bunkers should stay alive.
Mini reinforcement come after this mission is completed.
Kill the T1 Threat (87 XP)[]
In this mission 5 Gargantuans OR Metasis will spawn around the map and have to be killed. A very large number of hunters will also spawn alongside them so be prepared.
Camp east bunkers and move out to hunt down any leftover T1s.
Chapter 1[]
Seal the Holes (35 XP per Hole)[]
Dr. Morrow asks you to help the Research Facility that's attacked by a huge amount of zombies that originate from three holes (marked on the map in red) around the research facility. To seal the hole you have to use three satchels that are dropped at the airport (marked on the map in yellow).
All holes spawn packs of smaller zombies, occasionally Unburied and Bruchus with detection.
The holes on the east side of the facility are rather easy, because of the open terrain around them. Usually the ghost (or other MOS) can do them alone.
The third hole, on the west side, is much more dangerous because of its only way in and out. It's helpful if the team, ARs/FSS/OSS, cover the satchel carrier and clear out any zombies around the hole. Field camera / ground flare/ flare gun / motion sensor / binoculars providing vision of the third hill have proven useful for the satchel carrier to assess the situation and find the right timing to go up the ramp.
Thresher Maws (96 XP)[]
The satchel explosions spawn 2 Thresher Maws, huge and fast worms that push players aside and deal damage. They can be kited to some extent and should be kept away from the bunkers. Kiting, Crowd Control, and focus fire on the Maws is the key to success for this mission. Note that if you did not complete the previous mission, this one will not happen.
Destroy the Fungus Cores (70 XP)[]
Between the RA Facility and Windsors HQ several Fungus Cores will appear. These spawn creep around them, that allows zombies to travel faster. A success in this mission is not required to get the Epilogue, but advisable because on failure all leftover fungus will double and continue to spread.
Note: Not every zombie moves faster on creep, and the ones that do move 30% faster.
A good Tactic Use the FSSs CFF ability to destroy them. Use the OSS’ Orbital strike skill. Use any sort of explosives or ability (Rifleman Grenades, SDM/Specter Mono, Flamer Fuel Discharge) works too. A large number of T1s (Around 10 to 15 of them in NM: Gluttons, Hunters, Curseds and Raisulis) will spawn, so be prepared
Tip: Try to avoid crossing the fungus, zombies run faster on it.
[]
Detain the Spy (87 XP for capture, 52 XP for escort)[]
This mission tasks you to find a cloaked spy that's traveling around the map before the timer runs out. The Spy spawn at one of two locations near Thalim or Kulani. Once someone has found the spy, it becomes an invincible, player-controlled unit and must be moved to Windsors HQ. One tactic for this mission is to have people with detection (Ghost, Borg, Flashlight carriers) move to the two spawn locations during the Fungus mission. Additionally, it is a good idea to place Ground Flares or Field Cameras at choke points around the map. If the spy is not found shortly after the mission begins, anyone that can survive on his own should go out and look for the spy with binoculars, flares or flashlights. This mission can be stalled by finding the spy and moving it close, but not into, the mission end area. Use this time to revive any dead people and prepare for the next mission.
Tranquilize Zombie (43 XP for tranquilizing, 87 XP for delivery)[]
Arachnathid and a fair number of hunters spawns during this mission. For this mission Dr.Morrow wants you to tranquilize a zombie that seems different from all other zombies. You need to take the tranquilizer weapon from his lab (marked on the map), and go to the special zombie (marked green on the minimap). After you tranquilized the zombie it becomes a specimen, you’ll have to pick up the specimen and bring it back to the lab. The zombie spawns either northeast of Kurin or southeast of Guslani. Usually the Ghost or any other invisible MOS can do this alone without any trouble. Pick up the item at the research facility and move to the zombie. Then bring the zombie back to the research facility. While carrying the zombie, players will have their movespeed reduced by .58ms. This mission can be stalled to revive dead players or farm exp.
Defend Guslani / Defend the Security Detail (70 XP for defend)[]
(At the moment of writing this, only the option to defend Guslani works.)
This mission is straightforward. At least one Civilian or Soldier in Guslani must survive for the duration of the timer. As soon as the mission comes up 4 Police and 4 Civilians will spawn in Guslani. The whole squad except for the CE and any VT users should move together to Guslani. Spread out between the north and south side of the town and kill all zombies that approach it. Use kiting and explosives or air support as needed. After the mission is completed move back to Balaad.
Chapter 2[]
Experimental Vaccine (17 XP per vaccine x8)[]
Several vaccines drop at Windsor’s house and have to be distributed at:
● 2 in Thalim
● 2 in Kurin
● 3 in the Highlands
● 1 in Guslani
The Vaccine is a clickable item in your inventory after you pick it up. You must stand in the areas marked and click it for that marker to count as finished. A good idea is to have three people do the different areas on the map. Stealth or High Mobility classes should take the Vaccines in Thalim, Kurin and the Highlands. Guslani can be done by most other MOS, but be careful because there generally is a very large number of zombies around there after the previous mission.
Protect Morrow (35 XP per Sample x 7)[]
In this mission, Dr. Morrow moves out of his laboratory to collect samples from the surrounding area. He moves slightly faster than a regular soldier, has 500 HP and is using a kevlar for 50 shields with 5 armor. It is highly advised to NOT use incendiary rounds(AR) or FMJ rounds(HG) or meltdown (Cyborg) Because these abilities can contribute in killing Dr.Morrow. The sample collection sites are landmarks in the central part of the map. The order of the sites is random and Morrow moves between them without stopping. Throughout the entire mission, Morrow’s current location is marked on the map with a yellow cross.
Your team will require a lot firepower to take down the approaching zombies before they kill the Doc. Thus the whole team should move out and execute kiting strategies to keep the zombies away from Morrow. Player characters seem to have a higher priority over Morrow for zombie attacks, so staying near Morrow will prevent the zombies from attacking him. Use Air Support and other long cooldown abilities as needed and keep flares up to spot zombies early. Smoke grenades are also useful. Extreme caution with Explosives is advised, as Morrow sometimes moves in a zombie bulk without getting attacked.
Apiaries (17xp per Apiary x 8, 52 XP for completion)[]
8 apiaries spawn in the northernmost third of the map across the river, around Thalim. They are huge zombies that shoot fast projectiles at short range and spawn flyers periodically. To deal quickly with them CFF or explosives (MRL;Jav Gunner, Grenadier) are important, but they can also be gunned down by any MOS. Cav Scouts Heartbeat Sensor and OSS T1 scan are especially handy for this mission, because they can help you find the missing Apiaries. Strafing run by a FSS will also help to search and kill apiaries quickly.
Police Officers (17 XP per Officer saved)[]
10 Police officers have to be rescued. Most of them spawn in the highlands west of thalim and south of RA base and turned in on Thalim. At least 1 has to be turned in for the mission to succeed. Players dead for 4 minutes or more will receive a mini after this mission.
T1 (175 XP)[]
2 Darreus and 1 Minerva have to be killed. A large number of lesser T1s (Hunters, Cursed, Raisulis, yetis) also spawn alongside them, along with mutated zombies such as Unburied and normal zombies which move at a much faster rate. The team should regroup at base quickly and try to kill Minerva first if possible.
Chapter 3[]
Rescue Soldiers (17 XP per Soldier x6)[]
A squad of 6 riflemen will spawn on BMDD/Radio hill or the hill just west of the highlands satchel place and have to be brought to the little hill west of the airfield. Any Soldier can do this mission, even though a little back up can never hurt. Right-click the soldiers once you arrive at their position and they behave like Minis until you reach the destination. Sometimes a Gargantuan spawns extremely close to the soldier and wipes them before you can reach them.
Generators (140 XP for gens, 43 XP for zombie transport(automatic))[]
In this mission the team's job is to power up 3 Generators, each needing 300 energy. Players must be standing close to the generator let it drain your energy. The generators periodically spawn parasites which are extremely fast small enemies that drain 5 energy per hit. They are classified as armored which means you cannot riflebutt them (save for cyborg strength 3 active). If you let them fill their energy (20/20) then they morph into a killable albeit extremely tough cocoon which hatches after 10 seconds into either a leaper, licker, wraith, or arch vile.When you charge a generator the energy transfer rate is 6 energy for 4 generator charge. After you powered the generators the scientists transport the Specimen out of the AO.
A common strategy is to place energy cells at generators BEFORE the mission starts and DO NOT take the energy cells left there. These cells are used to keep the energy of the people filling the generators up, so they can continue fighting afterwards. Moving as a group, if not the whole team as one, is advisable. Generator 3 (or the last one) is generally the most difficult because all zombies will swarm that area.
Enter the East Outpost (8 XP per soldier, including minis)[]
Cpt. O’Reilly wants to meet you squad in the east outpost. At least one person must enter it alive for the mission to succeed. The first person to arrive will have to wait a second for the door to open. Once the door has begun opening, however, they can jump in through the door without waiting for a complete opening animation. Use Sprint and Jump Tactics to get into the outpost fast. If you have time left you can camp at the door and get some more EXP before you enter.
Kill RA Snipers (87 XP)[]
You need to kill the snipers that killed Cpt. O’Reilly. They are spread out around your position near the east outpost, and can spawn randomly in any of the following locations:
● Guslani
● Any of the Hills to the north
● Airport
● Central dropship point (near generator 3)
As they are snipers, they have a long range and deal huge damage with each shot. They can also detect cloaked units from extremely long range. Most MOS will die to two or three shots from them. The SDM can make quick work of them if he knows where they are. The same goes for a FSS Strafe run or any other long range ability (Specter, MGL, Cluster Rockets). To help spot them you can place ground flares or motion sensors during the previous mission or have a Ghost get the ISR Skill. Binoculars and other vision granting ability help too. A free Cav Scout or Javelin Gunner (Mini) can prepare the spawn locations with Claymore mines to provide vision and take out the Snipers.
Get in the RA Facility and Rescue Illidan (26 XP for Gate, 87 XP for evac)[]
After the snipers are killed you are tasked with rescuing WO Illidan from the RA Facility to the north. To get access to it, a satchel charge is air dropped (marked on the map). The team should stick together because a massive amount of different zombies will begin swarming the map. Retrieve the satchel from the drop and place it at the door to trigger the explosion. After the explosion concentrate your firepower into the door area to kill the RA Soldiers that will stream out and Mechs. A well placed Ion Cannon can do this job very quickly. AWT or Strafe runs, cluster rockets or MGLs work too. The team should stick together because a massive amount of different zombies are swarming the map. Retrieve the satchel from the drop and place it at the door to trigger the explosion. After the explosion concentrate your firepower into the door area to kill the RA Soldiers that will stream out. A well placed Ion Cannon can do this job very quickly. AWT or Strafe runs, cluster rockets or MGLs work too. Make sure you also kill the 4 Turrets and the facility’s mechs just behind the door by using binoculars and aforementioned abilities. There are probably still a few single hostiles in the building that can be killed with regular weapons. Illidan is held captive in the left part of the building, there is a mech walker in the room with him. After you’ve found him, immediately hurry back to the base to prepare for the next mission. After you’ve found him, escort him back to the Dropship. Illidian is invincible during this time, so delay talking with him as long as possible, since he’ll have no problem getting to the ship. This will give your team time to set up base and be ready for the final T1 wave. Shortly after Illidan is talked to, a 1 minute timer before T1s arrive will begin.
Note: You have to rescue Illidan BEFORE the T1 spawn to unlock the epilogue.
Kill T1 (700 XP, 5 XP per Soldier extracted, minis included)[]
If you are eligible to unlock the epilogue, you will normally get a dialogue with Captain Crunch saying that the rescue ship will come in 10 minutes, to unlock epilogue you must kill all T1s before that 10 minute mark is reached. Around 15 bosses will spawn, including Cacumen (a very fast boss), 2 Arachnatid, Ares, Minerva, Livid and Darreus, plus very large numbers of hunters, yetis, raisulis and other lesser T1s. At that point kiting will be less effective and raw dps will matter more. The team has to regroup quickly and make good use of 5 charges on the LLDR, each does 18,000 damage at the epicenter, AWT and other support abilities to take out every T1 coming at you ASAP. It is advised to let a slower T1, such as a Gourmand, survive and let the team revive and search or items, then kill it when the timer reaches around 1 min. To prepare for epilogue, revive as many people as possible, ideally the DPS roles, and ensure they collect important DPS-boosting items they need before everyone gets on the ship. Items are kept going into the epilogue, even if you don’t get on the ship. Once the epilogue starts, however, all items will be wiped off the map, so items on dead bodies will be gone.
Chapter 4 (Epilogue)[]
The Epilogue is straightforward. Every mission consists of two parts: retrieve the satchel from the drop zone, plant it at the tunnel, defend it until it blows up. When you first spawn in the middle, be sure to turn on Night Vision, using the NOD button next to the sa button on the console. During the Defend part, a strong boss called Charon will appear and begin attacking your team or the Satchel. During the satchel portions of the mission Charon cannot be killed, so do not waste abilities on him. When Charon appears, he will begin firing a powerful ranged attack that causes instant Severe Parasite infections to anyone hit. Tank MOS(Flamer/Enforcer/Cyborg) should tank these hits as much as possible. Giving lift boots to these roles is recommended so they can jump to Charon as soon as he appears. The Combat Engineer should place all of his barricades and turrets near to the satchel charge, so they attract zombies to it when it explodes, take Charon’s attacks if he spawns near the satchel charge, and also to ensure that they are destroyed before the next satchel so he can place them there as well.
Seal Tunnel 1(52 XP)[]
The first tunnel is on the southeast side of Kurin. After you placed the satchel, spread out around the hill, with most people at the ramp to the northwest. Place flares and cams around the area to spot Charon early.
Seal Tunnel 2(52 XP)[]
The second tunnel is on the southwest side of the hill where Illidan's dropship arrives. The team should spread out on top of the hill and cover all sides. Many flying T1s spawn during this satchel.
Seal Tunnel 3(52 XP)[]
The third and last tunnel is on the west side of the Highlands. The Team should spread out across the hills. Strategies from the other Tunnels work here too. Many many bosses spawn this time, including 2 Thresher Maws and a Grotesque.
Note: If a satchel is destroyed during the process there will be a 30 second timer that starts. At the end of the timer a fourth (and final) satchel will spawn. If you lose this 4th satchel, you will instantly fail the mission and lose the game.
Kill Charon and all remaining Zombies(87 XP for Charon, 175 XP for remaining zombies)[]
After the last Tunnel is destroyed, the whole team needs to move to the camping location as fast as possible. A common place to camp is the radio hill(as per UA3: BMDD2 hill) in the north-west of the map. DPS should stay on the hill, and kiters/tank keep the zombies in range of the DPS MOS. The amount of zombies that approach the team location is huge. All different kinds of zombies appear and must be dealt with before they overrun your position. The final boss Charon appears for one last attack on you. He is the top priority for your team to kill. During his invulnerability phase he must be tanked or kited around. If you fail to kill him quickly he will burrow and pop up elsewhere before approaching the base again. Once he is dead all remaining zombies on the map will begin to be pinged and you simply clean them up.
All Nightmare and Epilogue with most missions completed successfully should earn around 3500 XP.